Type 2 vs Type 3 Anodizing: How Buyers Choose the Right Finish for Functional Aluminum Parts
Type 2 vs Type 3 Anodizing: How Buyers Choose the Right Finish for Functional Aluminum Parts
type 2 vs type 3 anodizing is a commercial manufacturing topic for buyers who need more than a general process explanation. The real decision is how a drawing, material target, quantity and final-use requirement can become a reliable finished component.
For a Anodizing project, Neway should review RFQ files, DFM risks, material choices, tooling or process planning, CNC post-machining, surface finishing, inspection and packaging before production is locked. Reviewing these items early reduces rework, quote confusion and repeat-order instability.

What Does Type 2 vs Type 3 Anodizing Mean for Buyers?
Buyers searching for type 2 vs type 3 anodizing usually need a manufacturing decision, not a dictionary definition. They want to know whether the part can be quoted, sampled, tooled, machined, finished, inspected and delivered without avoidable risk.
For Neway, the useful answer connects the buyer's CAD files, material target, quantity, tolerance notes and final-use requirements with the right Anodizing route. That is why this topic should support the Anodizing page as a commercial entry point.
Finish planning item | Why it matters | Buyer decision |
|---|---|---|
Visible surfaces in What Does Type 2 vs Type 3 Anodizing Mean for Buyers? | Gate marks, parting lines, pores and scratches can affect final appearance | Define cosmetic faces before tooling or process release |
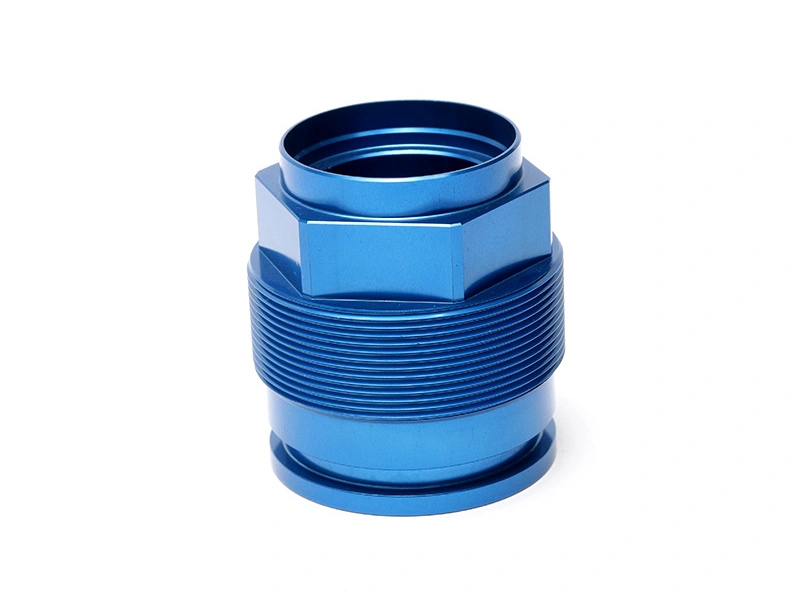
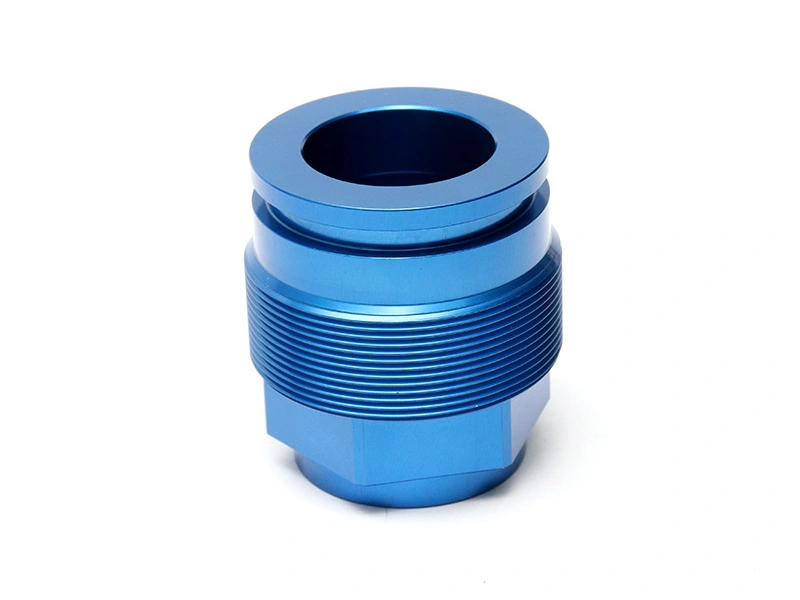
Coating thickness and masking for type 2 vs type 3 anodizing | Threads, bores, sealing faces and fits can change after finishing | Confirm protected areas and tolerances |
Color or texture sample for What Does Type 2 vs Type 3 Anodizing Mean for Buyers? | Appearance standards are hard to judge from words alone | Approve a physical or documented sample |
Packaging protection | Finished parts from What Does Type 2 vs Type 3 Anodizing Mean for Buyers? can be damaged during transport | Set packing method before shipment |
When Type 2 Anodizing Is the Better Choice
In When Type 2 Anodizing Is the Better Choice, surface finishing should be planned early because it can change appearance, corrosion protection, wear behavior, assembly clearance and packaging needs for type 2 vs type 3 anodizing.
Visible surfaces, masked areas, coating thickness, color standards and acceptable defect limits for When Type 2 Anodizing Is the Better Choice should be defined before the order moves into production.
Finish planning item | Why it matters | Buyer decision |
|---|---|---|
Visible surfaces in When Type 2 Anodizing Is the Better Choice | Gate marks, parting lines, pores and scratches can affect final appearance | Define cosmetic faces before tooling or process release |
Coating thickness and masking for type 2 vs type 3 anodizing | Threads, bores, sealing faces and fits can change after finishing | Confirm protected areas and tolerances |
Color or texture sample for When Type 2 Anodizing Is the Better Choice | Appearance standards are hard to judge from words alone | Approve a physical or documented sample |
Packaging protection | Finished parts from When Type 2 Anodizing Is the Better Choice can be damaged during transport | Set packing method before shipment |
When Type 3 Hardcoat Anodizing Is Needed
In When Type 3 Hardcoat Anodizing Is Needed, surface finishing should be planned early because it can change appearance, corrosion protection, wear behavior, assembly clearance and packaging needs for type 2 vs type 3 anodizing.
Visible surfaces, masked areas, coating thickness, color standards and acceptable defect limits for When Type 3 Hardcoat Anodizing Is Needed should be defined before the order moves into production.
Finish planning item | Why it matters | Buyer decision |
|---|---|---|
Visible surfaces in When Type 3 Hardcoat Anodizing Is Needed | Gate marks, parting lines, pores and scratches can affect final appearance | Define cosmetic faces before tooling or process release |
Coating thickness and masking for type 2 vs type 3 anodizing | Threads, bores, sealing faces and fits can change after finishing | Confirm protected areas and tolerances |
Color or texture sample for When Type 3 Hardcoat Anodizing Is Needed | Appearance standards are hard to judge from words alone | Approve a physical or documented sample |
Packaging protection | Finished parts from When Type 3 Hardcoat Anodizing Is Needed can be damaged during transport | Set packing method before shipment |
How Coating Thickness Changes Tolerance and Assembly Fit
For How Coating Thickness Changes Tolerance and Assembly Fit, many parts made through type 2 vs type 3 anodizing still need local CNC machining before they are ready to use. Threads, bores, mounting faces, sealing areas, datum surfaces and locating holes often need tighter control than the primary forming process can provide.
Buyers should define as-formed surfaces, machined surfaces, cosmetic areas, coating areas and inspection datums for How Coating Thickness Changes Tolerance and Assembly Fit before production starts. That prevents late fixture changes and assembly disputes.
Finished feature | Why it needs planning | Quality control |
|---|---|---|
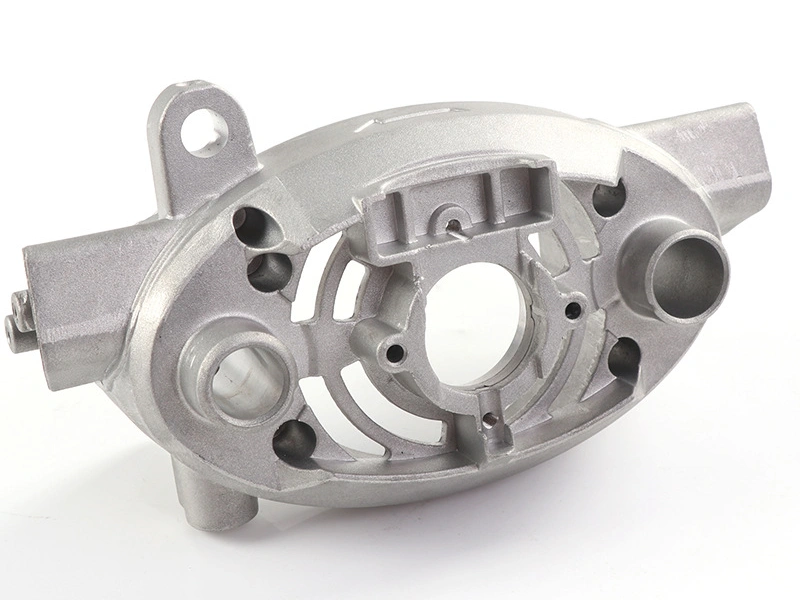
Threaded holes in How Coating Thickness Changes Tolerance and Assembly Fit | Fastening reliability depends on thread depth, alignment and cleanliness | Tapping check and thread gauge inspection |
Mounting faces for type 2 vs type 3 anodizing | Stable assembly depends on flatness and datum control after the primary process | CNC fixture control and flatness check |
Sealing or contact surfaces in How Coating Thickness Changes Tolerance and Assembly Fit | Leakage and contact quality need more control than as-cast or as-formed surfaces | Post-machining plus surface inspection |
Locating holes and datums | Assembly position and inspection reference depend on repeatability in How Coating Thickness Changes Tolerance and Assembly Fit | CMM or dedicated fixture inspection |
How Material and Casting Quality Affect Anodizing Results
In How Material and Casting Quality Affect Anodizing Results, surface finishing should be planned early because it can change appearance, corrosion protection, wear behavior, assembly clearance and packaging needs for type 2 vs type 3 anodizing.
Visible surfaces, masked areas, coating thickness, color standards and acceptable defect limits for How Material and Casting Quality Affect Anodizing Results should be defined before the order moves into production.
Finish planning item | Why it matters | Buyer decision |
|---|---|---|
Visible surfaces in How Material and Casting Quality Affect Anodizing Results | Gate marks, parting lines, pores and scratches can affect final appearance | Define cosmetic faces before tooling or process release |
Coating thickness and masking for type 2 vs type 3 anodizing | Threads, bores, sealing faces and fits can change after finishing | Confirm protected areas and tolerances |
Color or texture sample for How Material and Casting Quality Affect Anodizing Results | Appearance standards are hard to judge from words alone | Approve a physical or documented sample |
Packaging protection | Finished parts from How Material and Casting Quality Affect Anodizing Results can be damaged during transport | Set packing method before shipment |
Masking, Threads and Critical Surfaces Before Anodizing
For Masking, Threads and Critical Surfaces Before Anodizing, many parts made through type 2 vs type 3 anodizing still need local CNC machining before they are ready to use. Threads, bores, mounting faces, sealing areas, datum surfaces and locating holes often need tighter control than the primary forming process can provide.
Buyers should define as-formed surfaces, machined surfaces, cosmetic areas, coating areas and inspection datums for Masking, Threads and Critical Surfaces Before Anodizing before production starts. That prevents late fixture changes and assembly disputes.
Finished feature | Why it needs planning | Quality control |
|---|---|---|
Threaded holes in Masking, Threads and Critical Surfaces Before Anodizing | Fastening reliability depends on thread depth, alignment and cleanliness | Tapping check and thread gauge inspection |
Mounting faces for type 2 vs type 3 anodizing | Stable assembly depends on flatness and datum control after the primary process | CNC fixture control and flatness check |
Sealing or contact surfaces in Masking, Threads and Critical Surfaces Before Anodizing | Leakage and contact quality need more control than as-cast or as-formed surfaces | Post-machining plus surface inspection |
Locating holes and datums | Assembly position and inspection reference depend on repeatability in Masking, Threads and Critical Surfaces Before Anodizing | CMM or dedicated fixture inspection |
Inspection Methods for Anodized Aluminum Parts
For Inspection Methods for Anodized Aluminum Parts, quality control for type 2 vs type 3 anodizing should be built into the manufacturing route instead of waiting for final visual inspection. Buyers need material records, first article checks, dimensional inspection, finish review and batch traceability where the part risk requires it.
Inspection in Inspection Methods for Anodized Aluminum Parts should focus on features that affect fit, function, safety, appearance and repeat orders. That keeps the acceptance standard clear for both sample approval and production delivery.
Quality control item | What it verifies | Buyer value |
|---|---|---|
Material verification for Inspection Methods for Anodized Aluminum Parts | Alloy, resin, hardness or batch identity | Prevents wrong material use |
First article inspection in type 2 vs type 3 anodizing | Critical dimensions, finish and sample approval status | Locks the production starting point |
In-process inspection for Inspection Methods for Anodized Aluminum Parts | Batch drift during casting, machining or finishing | Finds problems before a full lot is affected |
Batch traceability | Material, process, inspection and packaging records for Inspection Methods for Anodized Aluminum Parts | Supports repeat orders and issue tracking |
Cost and Lead-Time Factors Buyers Should Compare
In Cost and Lead-Time Factors Buyers Should Compare, the cost of type 2 vs type 3 anodizing should be compared as a complete manufacturing package. Unit price alone can miss tooling, fixture work, trial samples, CNC post-machining, surface finishing, inspection reports, packaging and repeat-order controls.
A reliable quote for Cost and Lead-Time Factors Buyers Should Compare should make the included scope clear, so buyers can compare suppliers on the same basis and avoid paying later for work that should have been planned at the start.
Cost driver | What buyers should compare | Manufacturing risk |
|---|---|---|
Tooling or setup scope in Cost and Lead-Time Factors Buyers Should Compare | Mold, fixture, trial run, correction and maintenance responsibility should be separated | Low upfront price can hide later rework cost |
Part complexity for type 2 vs type 3 anodizing | Slides, inserts, thin walls, deep ribs, cosmetic surfaces and machining allowance should be priced clearly in Cost and Lead-Time Factors Buyers Should Compare | The quote may not reflect real manufacturing difficulty |
Post-machining and finishing in Cost and Lead-Time Factors Buyers Should Compare | Confirms which holes, faces, threads, coating and masking steps are included | Finished part cost becomes higher than expected |
Inspection package | First article, CMM, surface checks, material records and batch traceability for Cost and Lead-Time Factors Buyers Should Compare | Buyer cannot compare suppliers on the same scope |
RFQ Checklist for Type 2 or Type 3 Anodizing
In RFQ Checklist for Type 2 or Type 3 Anodizing, surface finishing should be planned early because it can change appearance, corrosion protection, wear behavior, assembly clearance and packaging needs for type 2 vs type 3 anodizing.
Visible surfaces, masked areas, coating thickness, color standards and acceptable defect limits for RFQ Checklist for Type 2 or Type 3 Anodizing should be defined before the order moves into production.
RFQ item | Why it matters | Risk if missing |
|---|---|---|
3D model and 2D drawing for RFQ Checklist for Type 2 or Type 3 Anodizing | Shows geometry, tolerances, datum notes and critical features for this decision point | Supplier may quote a simple part while missing functional requirements |
Material grade and application for type 2 vs type 3 anodizing | Connects strength, corrosion, wear, weight and finish needs to the real use case | The selected process may not match the working environment |
Quantity and delivery stage for RFQ Checklist for Type 2 or Type 3 Anodizing | Separates prototype, low-volume and repeat production routes before price is compared | Tooling, inspection and unit price may be planned incorrectly |
Finish and inspection requirements | Defines final acceptance for RFQ Checklist for Type 2 or Type 3 Anodizing before production starts | Appearance or assembly disputes may appear after samples |
Buyers comparing related routes can also review Arc Anodizing, Aluminum Die Casting, Post Process when the project needs a connected material, process or finishing decision.
FAQ